In any web application Login is the first basic functionality which is automated first. In this article, we learn how to automate the login functionality of an application in our first Selenium Webdriver Login Test using Java. We will use the Mercury Tours demo Flight booking application to learn automation. This Test Script will be specifically written for Chrome Browser. We will see how to run Selenium Scripts in other browsers in the next article.
Prerequisites
There are few prerequisites, that we need to fulfill before writing a Selenium Test in Eclipse. Please go through the below articles if you need help.
- Java Installation & Environment Setup
- Download & Eclipse Installation
- Configure Selenium Webdriver With Eclipse
- Download the Chrome Browser Driver
Download the Chrome Browser Driver
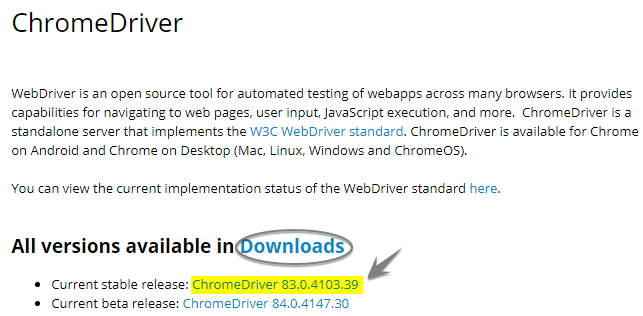
Go to https://sites.google.com/a/chromium.org/chromedriver/ to download ChromeDriver for Selenium Webdriver.
Click on the hyperlink given against the current stable release. Make sure the given version matches wit the current version of your Chrome browser. If your Chrome browser version is not the latest version click on the Downloads link to see all available versions and download the driver that matches your browser version. You will see the following page.

Download the chrome driver for the win32 version and place it under “C:\SeleniumBrowserDrivers”.Create a directory with this name in C drive.
Test Scenario
We will use the following scenario for Login Functionality
- Launch the Chrome browser
- Navigating to website “http://newtours.demoaut.com/”
- Wait for 5 Seconds to load the page
- Enter User Name and Password
- Press the Login button
- Close the Browser
In our previous post, Configure Selenium Webdriver With Eclipse we have created a java project named FirstSeleniumProject and inside this project, we created a class named “SeleniumFirstTestCase“.So far the class is empty and we have not written any piece of code inside it. I would recommend you to copy the below code in the class “SeleniumFirstTestCase“.
Selenium Webdriver Login Test Script Example
|
1 2 3 4 5 6 7 8 9 10 11 12 13 14 15 16 17 18 19 20 21 22 23 24 25 26 27 28 29 30 31 |
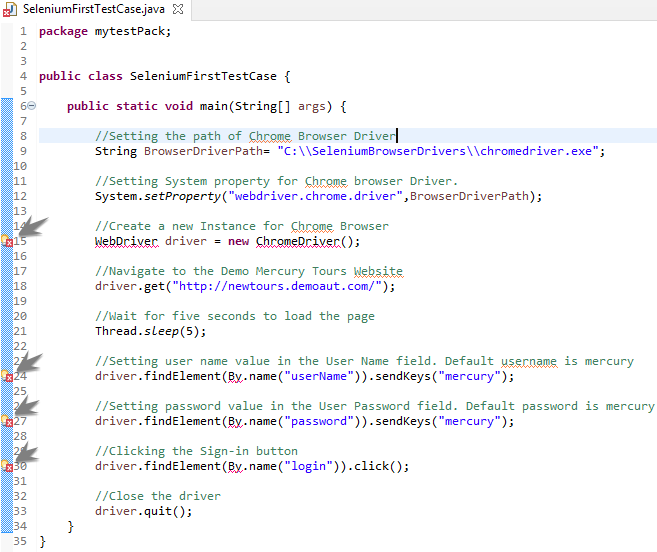
package mytestPack; public class SeleniumFirstTestCase { public static void main(String[] args) throws InterruptedException { //Setting System property for Chrome browser Driver. System.setProperty("webdriver.chrome.driver","C:\\SeleniumBrowserDrivers\\chromedriver.exe"); //Create a new Instance for Chrome Browser WebDriver driver = new ChromeDriver(); //Navigate to the Demo Mercury Tours Website driver.get("http://newtours.demoaut.com/"); //Wait for five seconds to load the page Thread.sleep(5); //Setting user name value in the User Name field. Default username is mercury driver.findElement(By.name("userName")).sendKeys("mercury"); //Setting password value in the User Password field. Default password is mercury driver.findElement(By.name("password")).sendKeys("mercury"); //Clicking the Sign-in button driver.findElement(By.name("login")).click(); //Close the driver driver.quit(); } } |
The Eclipse IDE will show you some errors against a few lines.
Resolve the Java Compilation Errors
The Eclipse IDE is a very powerful tool that comes with smart intelligence. If you hover the mouse over the error keyword in the editor Eclipse would automatically suggest the best possible solutions to the problem.
In our case, here we need to import the required packages for the methods that are being used in our test to refer to the classes/interfaces under which these methods are defined.
Place your mouse over the keyword ‘webdriver‘ and select the first option amongst the auto-populated suggestions.
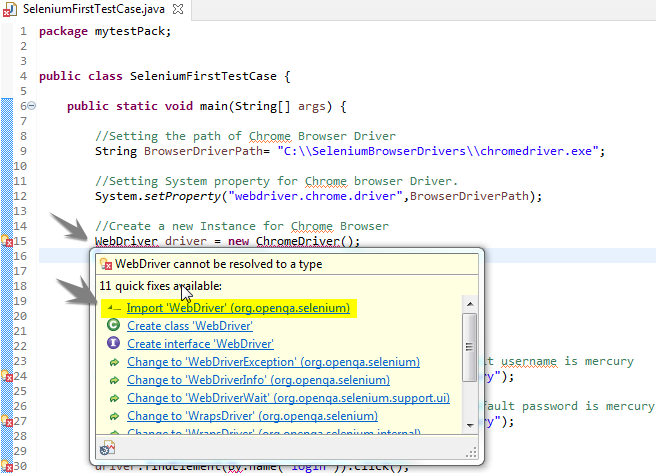
You will observe that an import statement “import org.openqa.selenium.WebDriver;” has been added before the class name and the error will be gone for the keyword ‘Webdriver‘.
In the same fashion place your cursor over the keyword ‘ChromeDriver()’ and select the very first option amongst the available solutions.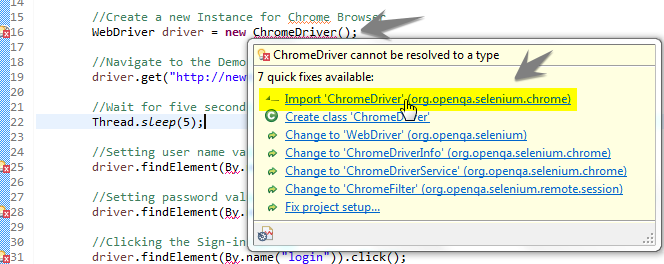
This will add the statement ‘import org.openqa.selenium.chrome.ChromeDriver;‘ and the error will be gone.
Now place over the mouse over the ‘By‘ keyword in any of the lines and select the first option to fix the issues with for all ‘By‘ keywords.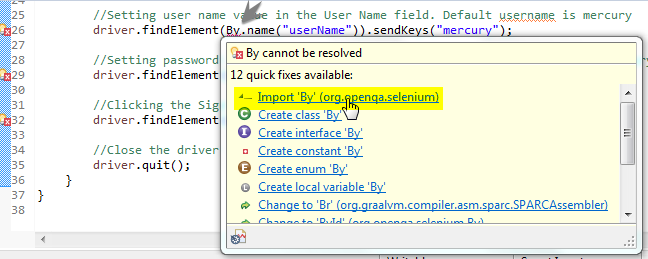
This will add the statement ‘import org.openqa.selenium.By;‘ and all errors for the ‘By‘ keyword will be gone.
Once these errors are fixed one more error will appear at the statement ‘Thread.sleep(5);‘, the process is the same hover the mouse over the error. This time Eclipse will show you the following solutions.

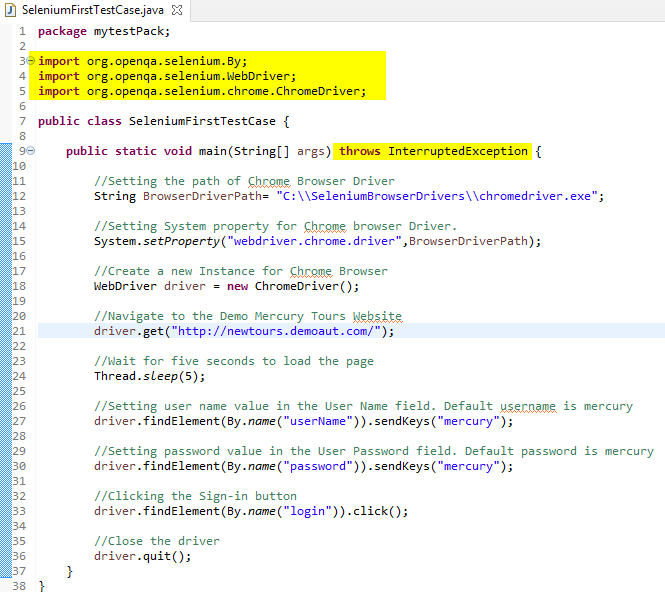
For the time being select the first option. It will add a throws clause for InterruptedException at the method declaration. As of now we will not deep dive with technical details of these statements instead we will discuss this later in the tutorial. Now the test script will look like the following image without any error.
How to Run the Selenium Webdriver Test
Right now we have written the whole code inside the main method of the class we can run the code as Java Application. To run the script go to “Run > Run As > Java Application” or do a right-click anywhere in the Java code and select “Run As > Java Application“.

Understanding Selenium Webdriver Java Code
- Defining and initializing variable BrowserDriverPath
Inside the main method, we have declared a variable BrowserDriverPath that contains the path of the Chromedriver executable file. This variable will be passed in the second parameter of System.setProperty() method.
- Setting System Property
The setProperty method is used to set the properties to invoke the desired browser during execution. The setProperty method has two parameters. The first one is “PropertyName” and the second one is “value.”
The PropertyName represents the name of the specific driver for the browser, and the value points to the path of that browser driver. Since we are using the chrome browser in this example we have passed the following values in the setProperty method.
In selenium, this method is used because the browser doesn’t have a built-in server to execute the Selenium code so all we need a Chrome/IE/Gecko and etc driver server for communicating the Selenium code to the browser.
- Instantiating an Object for Browser Driver
In Selenium Webdriver we don’t have any method wherein we just provide the URL for any specific browser which will open the required browser at runtime and navigate to the given URL. Here, you will have to create an object for the specific browser driver. As of now, you can simply consider the following statement
WebDriver driver = new ChromeDriver();
It will instantiate the object of the Chrome driver. As a result, as it will open a new Chrome browser that will have no plugins and extensions loaded. This instant of Chrome browser will look different from Chrome which is installed on your desktop.
- Navigating to a Website
When the Chrome driver object instance was created it was assigned to object variable driver (You can give any name). Using this variable we can access the get method. This method requires just one parameter value that is the URL and it will navigate you to that URL.
- Wait/Sleep Statment
Since it might take some time to open the specified URL, we have used Thread.sleep(5) statement to delay the execution for 5 seconds. However, it is not recommended to use it as it acts as a hard wait and even the page loads before the five seconds the sleep statement will still wait for five seconds. A better approach is available in Selenium that we will discuss later at a point in this tutorial.
- Locators in Selenium WebDriver
This is a huge topic in itself and has been explained exclusively in a different article. For more details on Selenium Webdriver locators, please refer to my article All about 8 Locators in Selenium Webdriver with Examples. For the time being, you can consider that Selenium can not perform any operation on an object unless it identifies it. We will have to provide some properties using which Selenium can uniquely identify an object on the page. In our script, we have used the name property to identify the username, password, and login button. Along with that we are using SendKeys() method to set text value in a text field and Click() method to click the Sign-in button.
- Closing the Instance of Driver
At the end of the script, we are closing the driver using the driver.quit() statement.It quits the driver and closes every associated window.
Recommended Posts
- Configure Selenium Webdriver With Eclipse
- How To Install TestNG in Eclipse
- Selenium Webdriver Login Test Script
- How to Select a Radio Button In Selenium WebDriver And Do Other Validations?
- How to Set Text Value in TextBox In Selenium WebDriver And Do Other Validations?
- Click a Button in Selenium WebDriver and Carry out Other Validations
- What is Selenium WebDriver & its Architecture?


great post, very informative. I’m wondering why the other specialists of this sector do not understand this. You should continue your writing. I am confident, you have a great readers’ base already!