When testing is carried out with multiple identical objects, UFT assigns an ordinal identifier to each test Object. However, this might lead to unreliable object identification.
To improve the object identification mechanism, UFT has introduced a new feature called Visual Relation Identifier ( VRI ) that identifies an object using its relative location, relation, and distance from neighboring objects.
You can select neighboring objects that will maintain the same relative location to the required object, even if the user interface design changes.
Visual Relation Identifiers ( VRI ) working principle
- During a run session, UFT first attempts to identify the test object using the object’s mandatory and assistive properties.
- If UFT finds only one object the required operation will be performed. However, if more than one object found, UFT attempts to identify the object using the visual relation identifier.
- After VRI is applied, if no objects or more than one object is found, the VRI fails, and UFT continues to Smart Identification (if smart identification is turned on for that test object class).
- After Smart Identification is applied, if no objects or more than one object is found, no ordinal identifiers are used for that test object.
How to configure Visual Relation Identifiers ( VRI) in UFT
The following diagram represents the way UFT interprets horizontal and vertical visual relations.
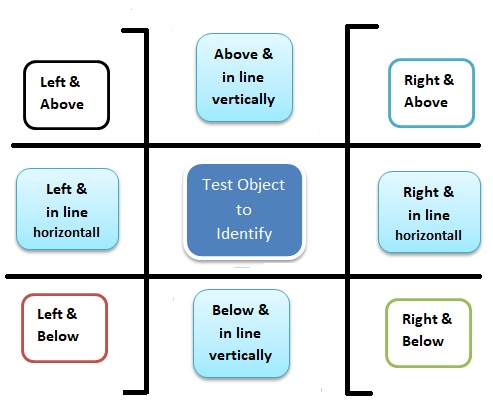 The test object to identify is the object for what VRI is required to be configured.
- If the neighboring object is at the right-hand side of the object it would be configured as “Right in line horizontally”.
- If the neighboring object is at the lefthand side of the object it would be configured as “Left in line horizontally”.
- If the neighboring object is above the object it would be configured as “Above in line vertically”.
- If the neighboring object is below the object it would be configured as “Below in line vertically”.
- If the neighboring object is an above and righthand side of the object it would be configured as “Right & above”.
- If the neighboring object is an above and lefthand side of the object it would be configured as “Left & above”.
- If the neighboring object is below and right-hand side of the object it would be configured as “Below & Right”.
- If the neighboring object is below and lefthand side of the object it would be configured as “Left & Below”.
VRI Key points to be remembered
- UFT identifies the related object as in line even if the area of the related object surface is only partially in line with the test object.
- If you define a visual relation identifier for a test object, then that test object’s ordinal identifier (if it exists) is not used during the test object identification process (when running steps, highlighting objects in the application, etc.). To indicate this, the Ordinal identifier option for that test object is disabled in the Object Repository window.
- If you delete a test object (X) that is used in the visual relation identifier for another test object (Y), you must make sure to remove the deleted test object “X” from the Related Object list for test object “Y”.
- A test object cannot be used as a related object to itself.
- UFT uses visual relation identifiers only when one or more objects match the test object’s description properties during the identification process. If no objects in the application match the test object’s description properties, then the visual relation identifier you defined is ignored, and UFT continues to Smart Identification (if defined for that test object class).
- The following test objects cannot act as related objects for another test object’s visual relation identifier:
- A test object that has a visual relation identifier.
- A child test object for one of its parent objects.
Steps to configure Visual Relation Identifiers (VRI) in UFT
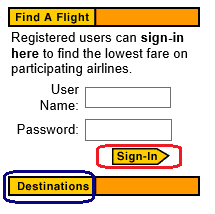
Step 1: Open the object repository and select the test object for which you want to configure Visual Relation Identifiers and click the dotted button to VRI.

Step 2: The following window would be displayed. Click on the + button.

Step 3: Select the Test Object window would be displayed. Expand the test object tree and select the neighbor object you want to consider as a relative object and press the “OK” button.

Step 4: Visual Relation Identifier window will be displayed. Do the required mapping from the available option and click on the “Preview” button to check whether the test object is identifiable.
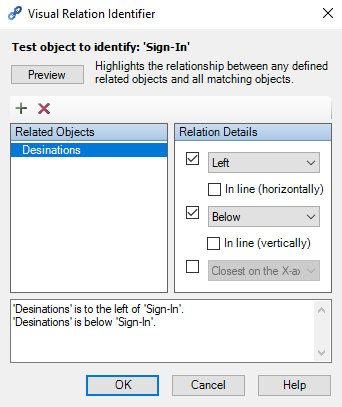
Step 5: If UFT finds a match, it would be displayed next to the Preview button.

Step 6: If only one match is found, it’s fine otherwise repeat the above steps add more related object objects until only one match is found, and finally click on the “OK” button.

Recommended Posts
- How to Use Virtual object in UFT to Identify Non-Standard Class Objects
- Find a Matching Pattern in String Using Regular Expression in UFT
- All You Need to Know About Object Identification in UFT
- How to Use Regular Expression in UFT to Identify an Object
- Action Input And Output Parameters In UFT
- How to Use Insight Object in UFT
- How to Debug a Test in UFT
- GetRoProperty , SetToProperty & GetToProperty in UFT With Example