The mainframe is a very high-speed processing computer. It is even faster than supercomputers. However, supercomputers can solve complex algorithms faster than a mainframe computer. The mainframe runs on the z/OS operating system. Windows-based terminal emulators are used to connecting users to IBM Mainframe. There are various terminal emulators available like Extra! X-treme, BlueZone and Tuxedo, etc to connect IBM Mainframe.
Mainframe testing includes validation of online CICS screens and TSO ISPF screens. Any maintenance done on the CICS screen generates outgoing files and reports on the nightly batch. In this article, you will learn how to configure the terminal emulator to start mainframe automation using UFT now known as UFT One.
Click here to subscribe to MySkillPoint official YouTube Channel
How to start Mainframe Automation using UFT
I am going to explain to you a very generic approach of Mainframe automation testing using which you can easily automate any kind of emulator-based application.
Mainframe Automation Prerequisites
Below is the prerequisite to automate the Terminal Emulator application.
- Terminal Emulator application should be in an opened state
- Terminal Emulator add-in must be associated with UFT
- Terminal Emulator should be configured in UFT
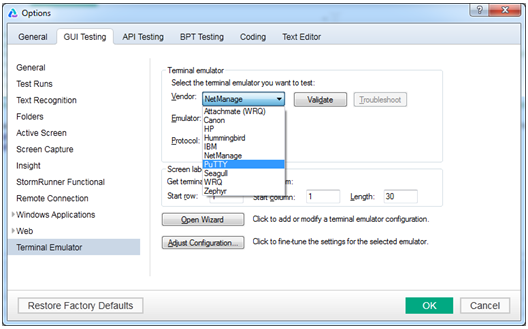
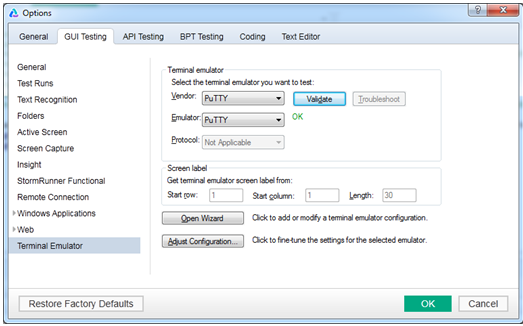
How to Configure Terminal Emulator in UFT
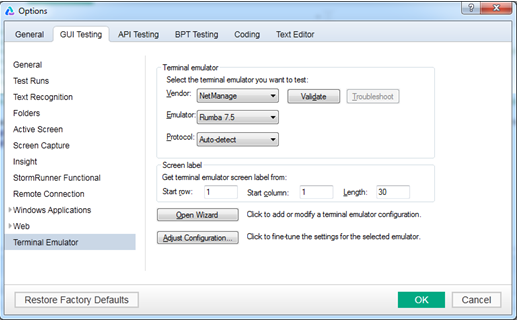

Other GUI-based applications have lots of objects like TextBox, Button, List Box, Hyperlinks, Web table and radio button, etc. However, in the case of the mainframe or any emulator application, we have to deal with just four types of objects.
| Test Object | Description |
| TeField | A terminal emulator field that fully supports HLLAPI. |
| TeScreen | A terminal emulator screen that fully supports HLLAPI. |
| TeTextScreen | A terminal emulator screen that uses text-only HLLAPI or does not support HLLAPI. |
| TeWindow | A terminal emulator window. |
Operations performed on a Mainframe Screen
UFT supports various methods to perform desired actions on a Mainframe screen. One can use the object repository for each object on a mainframe screen but that would not be a good approach because you have to maintain too many objects. Here I would recommend the best practices followed in the IT industry.
The entire mainframe screens can be automated by just using the following operations. We don’t need all the methods available on UFT for terminal emulator objects.
- Set Text at a particular field or coordinate(row and column)
- Get Text for a particular field or up to certain coordinates
- Sending keys like ENTER, ESC, F1, F7, and F8, etc.
- Using Sync method to wait for the next screen to load completely until it gets in ready state
Mainframe Automation Using UFT – Sample Code
The following example shows how we can set a text to a particular coordinate on a Mainframe screen. Also, it shows how we can retrieve text for the desired coordinates and how we can send the desired key on a Mainframe screen.
|
1 2 3 4 5 6 7 8 9 10 11 |
'Setting text at 10th row 15 column TeWindow("abc.*").TeScreen("test.*").SetText 10, 15, "Test123" 'Getting text from 10th row 02 column to 10th row 30 column sTextVar=TeWindow("abc.*").TeScreen("test.*").GetText (10,02,10,30) Msgbox sTextVar 'Displaying text value retried in the above step TeWindow("abc.*").TeScreen("test.*").SendKey("ENTER")'Sending Enter Key TeWindow("abc.*").TeScreen("test.*").Sync |
Please watch out the above attached video for more details and optimizing the automation test script code.
If you want to know best practices to automate the mainframe application please refer to the following video.
Click here to subscribe to MySkillPoint official YouTube Channel
Send Key List on Mainframe | Terminal Emulator
| Key | Mnemonic | Script Constant |
| @ | @@ | – |
| PA1 | @x | TE_PA1 |
| PA2 | @y | TE_PA2 |
| PA3 | @z | TE_PA3 |
| PA4 | @+ | TE_PA4 |
| PA5 | @% | TE_PA5 |
| PA6 | @& | TE_PA6 |
| PA7 | @’ | TE_PA7 |
| PA8 | @( | TE_PA8 |
| PA9 | @) | TE_PA9 |
| PA10 | @* | TE_PA10 |
| PF1 | @1 | TE_PF1 |
| PF2 | @2 | TE_PF2 |
| PF3 | @3 | TE_PF3 |
| PF4 | @4 | TE_PF4 |
| PF5 | @5 | TE_PF5 |
| PF6 | @6 | TE_PF6 |
| PF7 | @7 | TE_PF7 |
| PF8 | @8 | TE_PF8 |
| PF9 | @9 | TE_PF9 |
| PF10 | @a | TE_PF10 |
| PF11 | @b | TE_PF11 |
| PF12 | @c | TE_PF12 |
| PF13 | @d | TE_PF13 |
| PF14 | @e | TE_PF14 |
| PF15 | @f | TE_PF15 |
| PF16 | @g | TE_PF16 |
| PF17 | @h | TE_PF17 |
| PF18 | @i | TE_PF18 |
| PF19 | @j | TE_PF19 |
| PF20 | @k | TE_PF20 |
| PF21 | @l | TE_PF21 |
| PF22 | @m | TE_PF22 |
| PF23 | @n | TE_PF23 |
| PF24 | @o | TE_PF24 |
| Alternate Cursor | @$ | TE_ALTERNATE_CURSOR |
| Attention | @A@Q | TE_ATTENTION |
| Backspace | @< | TE_BACKSPACE |
| Backtab | @B | TE_BACKTAB |
| Clear | @C | TE_CLEAR |
| Cursor Down | @V | TE_DOWN |
| Cursor Left | @L | TE_LEFT |
| Cursor Right | @Z | TE_RIGHT |
| Cursor Select | @A@J | TE_CURSOR_SELECT |
| Cursor Up | @U | TE_UP |
| Delete Character | @D | TE_DELETE |
| Dup | @S@x | TE_DUP |
| Enter | @E | TE_ENTER |
| Erase EOF | @F | TE_ERASE_EOF |
| Erase Input | @A@F | TE_ERASE_INPUT |
| Field Exit | @A@E | TE_FIELD_EXIT |
| Field Mark | @S@y | TE_FIELD_MARK |
| Field Minus | @A@- | TE_FIELD_MINUS |
| Field Plus | @A@+ | TE_FIELD_PLUS |
| Home | @0 | TE_HOME |
| End | @q | TE_END |
| Insert Character | @I | TE_INSERT |
| New Line | @N | TE_NEW_LINE |
| Print Screen | @P | TE_LOCAL_PRINT |
| Page Down | @v | TE_PAGE_DOWN |
| Page Up | @u | TE_PAGE_UP |
| Reset | @R | TE_RESET |
| System Request | @A@H | TE_SYS_REQ |
| Tab | @T | TE_TAB |
| Help | @H | TE_HELP |
| ¢ (cent) | @A@c | TE_TEST |
| | (solid vertical bar) | @A@v | – |
| Backward Word | @A@z | – |
| Card Reader | @W | – |
| Cursor Left Double | @A@L | – |
| Cursor Right Double | @A@Z | – |
| Device Cancel | @A@R | – |
| Magnetic Slot Reader | @Y | – |
| Forward Word | @A@y | – |
If you still have any queries, please write them in the comment box.
Recommended Posts
- File Content Checkpoint | PDF File Validation in UFT
- Difference between ChildObjects and ChildItem in UFT
- Delete Browser Cookie, Cache, and History in UFT
- How to Use WaitProperty | Dynamic Wait in UFT
- GetRoProperty , SetToProperty & GetToProperty in UFT With Example
- Amazing Facts about Object Repository Manager in UFT
- How to Use Shell Scripting in UFT to SendKeys
- How To Use Dictionary Object in UFT With Examples
- How to Use Regular Expression in UFT to Identify an Object
- 20 VBA Date Functions in UFT That You Must Know