In my previous article, I have discussed how to configure the terminal emulator in UFT to automate the Mainframe application and how to write a Mainframe automation script. Having said that there are few instances where one might not able to configure the terminal emulator settings in UFT (one of the possible reasons could be emulator name is not available in the Vendor List).In that case, you will have to manually configure the emulator settings. Follow the below steps to do terminal Emulator Configuration in UFT.
Terminal Emulator Configuration
Step 1: Create a new GUI Test in UFT and go to “Tools>Option>GUI Testing> Terminal Emulator“.You will see the Options window to configure the Terminal emulator.
Step 2: Click on the Open Wizard button. Terminal EmulatorConfigiration Wizard will be shown.
Step 3: Click on the Next button. Specify Wizard Operation will be shown.
Step 4: Click on the Configure a new user-defined setting and select the appropriate vendor and emulator.
Step 5: Click on the Next button.
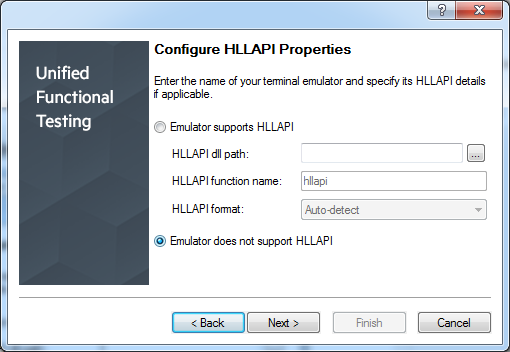
Step 6: Click on the Next button. Configure HLLAPI Properties window will be shown.
Step 7: If the emulator supports the hllapi, browse the HLLAPI dll.If it does not support, select the Emulator does no support HLLAPI option and click on the Next button
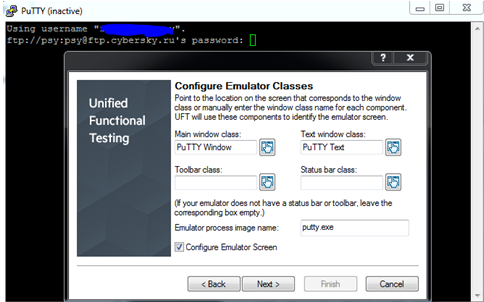
Step 8: Configure Emulator Classes window will be shown.
Step 9: Click on all the fingerpointing hand icons that are applicable and put it over the Emulator application corresponding classes.UFT will automatically identify the object of the respective classes and update the field values in the Configure Emulator window.
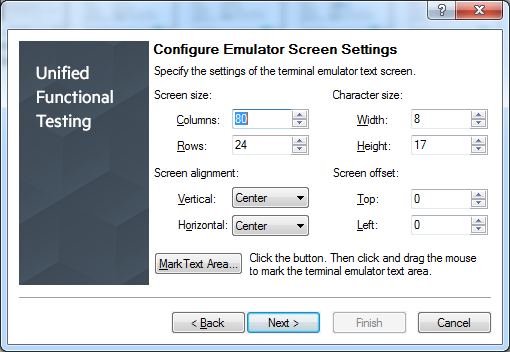
Step 10: Click on the Next button. The Configure Emulator Screen Settings window will be shown.
Step 11: The Emulator application screen will be displayed in a grid layout. Each cell represents space for one character. You can adjust the fields if required in such a way that only one character is displaying inside in grid cell and click on the Next button.
Step 12: Completing the Terminal Emulator Configuration Wizard window will be shown.
Step 13: You can also select the checkbox and save the configuration in your local machine and share it with other team members as well. They would have to just associate it on their machine in UFT.
Step 14: Click on the Finish button. I have successfully configured the “New Putty” emulator and on clicking the validate button it shows the OK message.

Copy Existing Terminal Emulator Configuration
You can also copy a terminal emulator configuration from one machine to another machine using the Terminal Emulator Configuration Wizard.
For instance, if the settings for your terminal emulator were configured and saved to a file on another PC (or on a network drive), one can copy this configuration file to his/her PC, rather than running the wizard and doing the settings again.
Prerequisites
In order to copy the existing Terminal Emulator configuration file, it must be saved to a registry file, using the Save terminal emulator settings to file option in the wizard’s last window.
Before you copy the saved configuration, make sure you know the vendor name and the emulator name assigned to the configuration and the exact name and location of the file.
Copy the Emulator Configurations registry file to your computer
Locate the registry file( .reg extension.) containing the configuration settings for your emulator and copy the file to the dat folder on your computer.
The path for the dat folder in a typical installation is %ProgramFiles%\HPE\Unified Functional Testing\dat.In my case, it is “C:\Program Files (x86)\HPE\Unified Functional Testing\dat”.
After copying the registry file to dat folder, you have to register it.
Register the file
Close the UFT and double-click the registry file to open the Registry Editor message box. It would display an alert box.
Click Yes to add the information to the registry. A message opens confirming that the information has been copied into the registry.
Click OK. The emulator name assigned to this configuration is added to the list of available terminal emulators for your UFT installation.
Set the new emulator as the default emulator – Optional
Now open UFT with the Terminal Emulator Add-in loaded.
Select the new emulator name from the list in the Tools > Options > GUI Testing tab > Terminal Emulator pane, and set it as your default emulator.
You can also, modify the emulator settings if required. Please refer to my post on Mainframe Automation-Manually Configuring Terminal Emulator in UFT to modify emulator settings.
Conclusion
After the configuration file is copied from another location, the emulator name assigned to this configuration is added to the list of available terminal emulators for your UFT installation.
Recommended Posts